If you want to install Oxwall manually you need to start by downloading the zip file from their official website.
Then you need to upload it to the desired folder and unzip it by right-clicking on it and selecting ‘Extract’.
After that open the folder containing the Oxwall files in your browser. If you have placed them in your public_html/oxwall/ folder , you should access it trough www.mywebsite.com/oxwall/
From there you can start the installation process.
If you get messages about missing PHP extensions, you can enable them from your cPanel >PHP Modules.
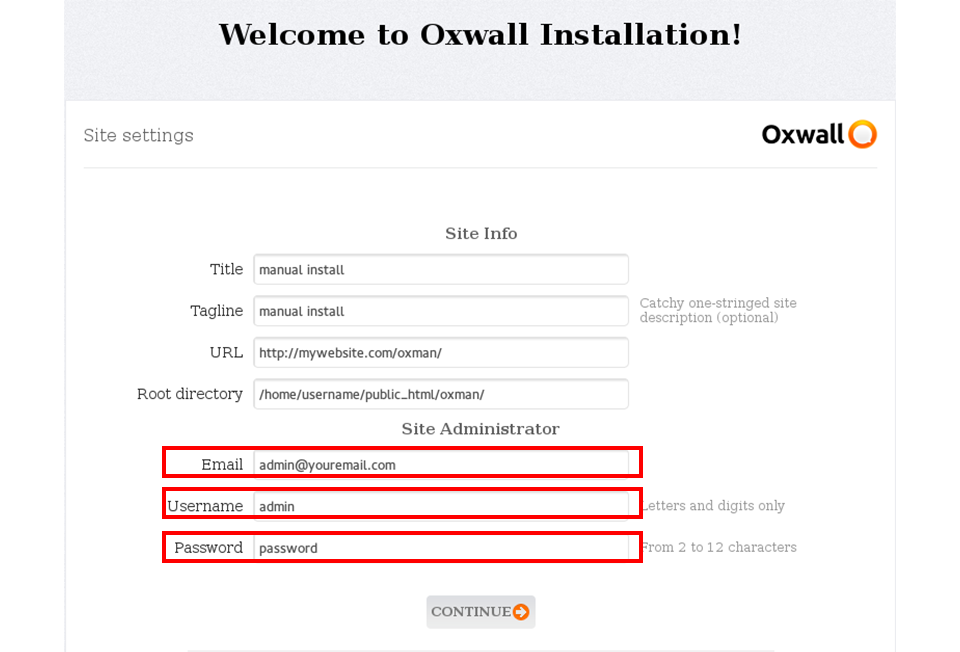
I. On the first step you will need to enter some basic information about the website. Be sure to provide a valid administration email and write down the username and password for the admin user.
II. The second step is the database connection. Here you will need to create a new empty database from cPanel > MySql Databases , create a MySql username (also write down the password for it).
Once created you need to add the username to the database. If you scroll down a bit on the ‘MySql Databases’ page in cPanel you will see ‘Add User To Database’ section where you have 2 drop-down menus.
Select the two newly created database and username and click ‘Add’. After that you will be redirected to a new page where you need to check ‘ALL PRIVILEGES’ and click ‘Make Changes’.
Then you can return to the Oxwall installation. You should fill the text fields as follows:
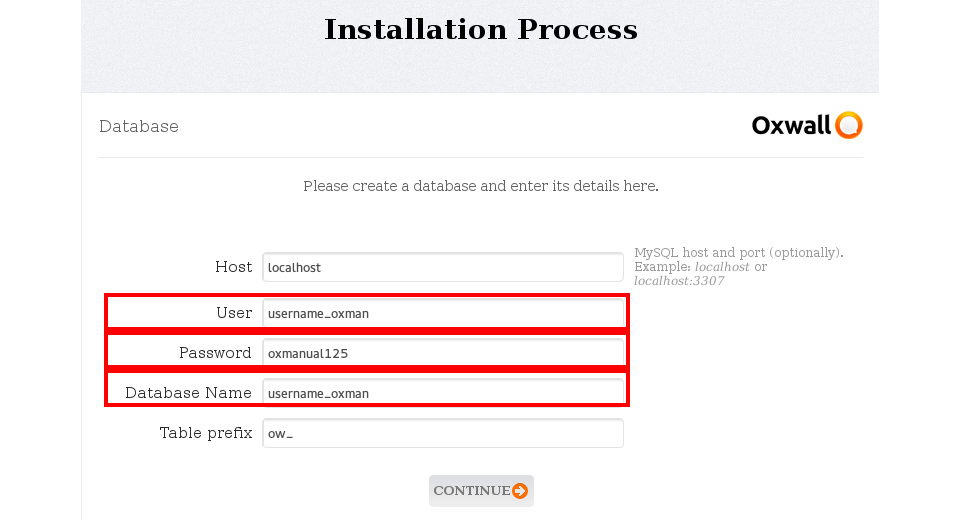

Host: localhost
User: your_mysqluser
Password: your_databasepass
Database Name: your_dbname
Table prefix: ow_
III. On the next step click ‘Continue’ to set the cron job running on every minute, we will edit it to run on every 10 minutes after the installation.
IV. This is the last step where you can select which plugins you would like to install along side with the application. Once you are done click ‘Finish’.
On the next page you should be presented with the ‘Installation complete’ message. From there you can choose to view the main page or the admin area.
Now we should change the time of the cron job that is running on every minute. In cPanel click on ‘Cron Jobs‘ under the Advanced tab.
If there is no cron job set to run on every minute you need to add it with the following command:
wget -q -O /dev/null http://mywebsite.com/ow_cron/run.php
Set 10 on ‘minute’ value and on all the rest set *. It should look like this:
10 * * * * wget -q -O /dev/null http://mywebsite.com/ow_cron/run.php
If there is already a cron job set, at the right end click ‘Edit‘ and change the value 1 to 10 and click ‘Edit line’.

You can go to the main page and finish your profile set-up and you should be logged in as admin.
With this the manual installation of Oxwall is completed.

